
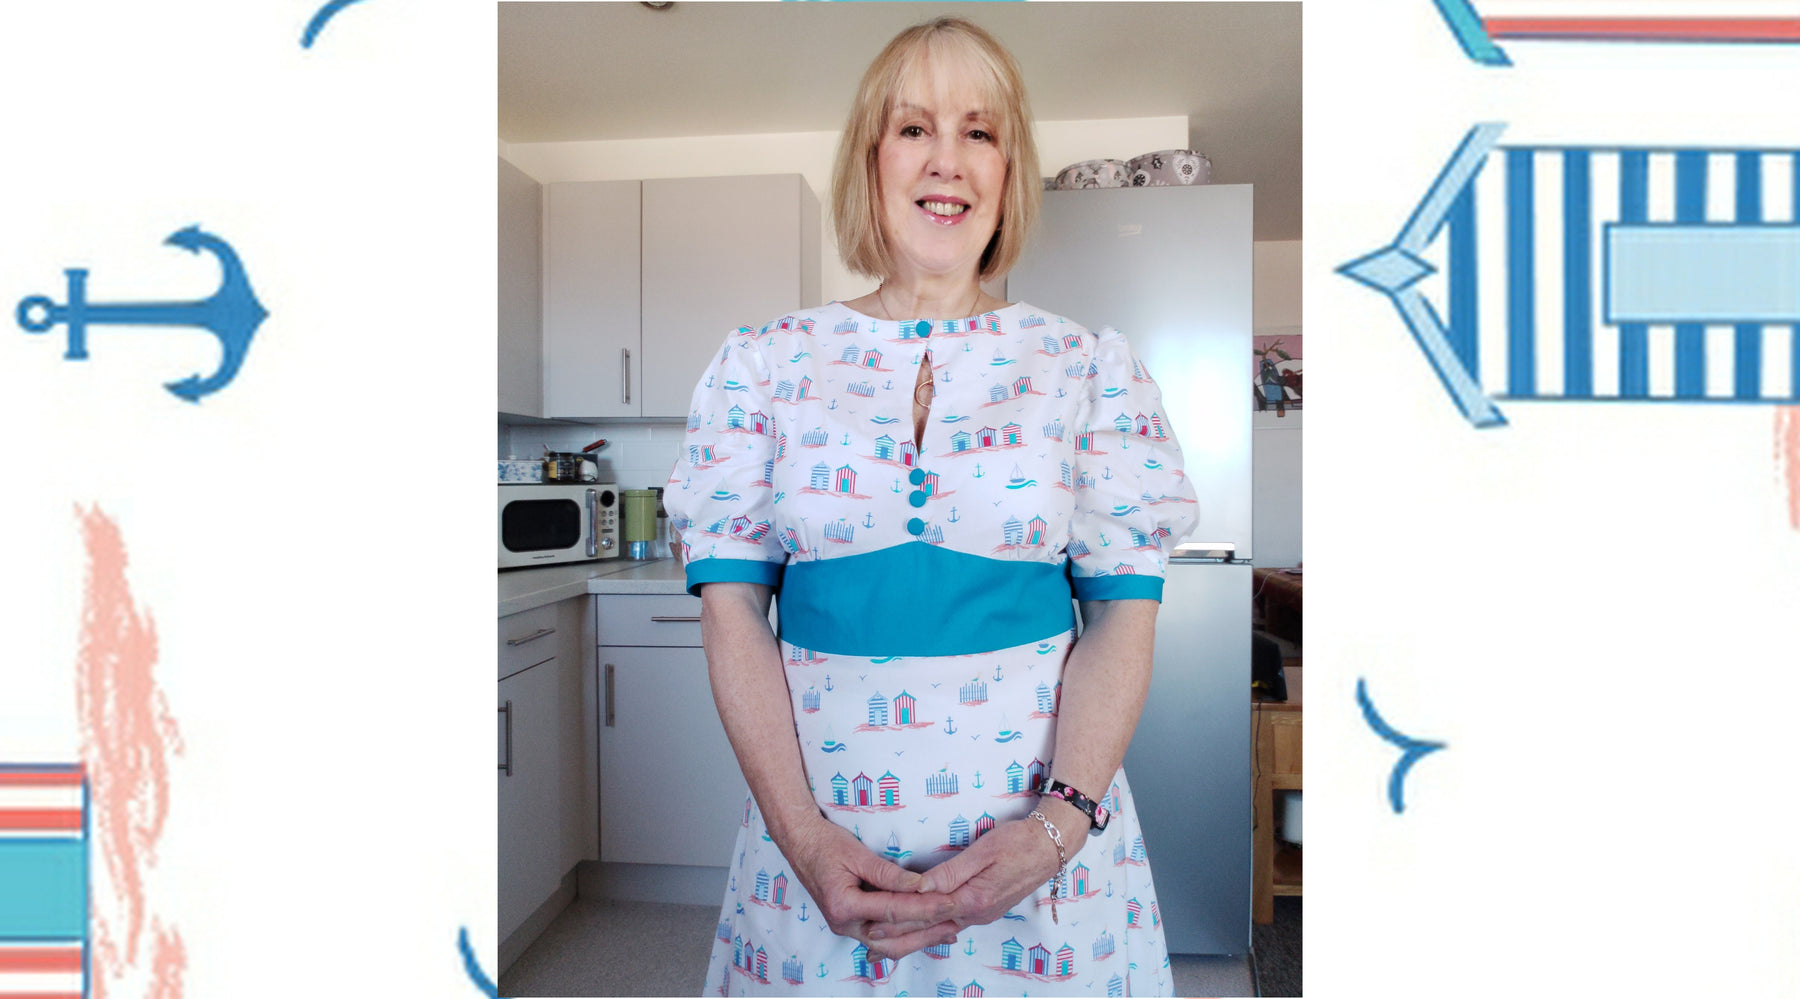
Summer Dress in Beach Huts Fabric

This 100% Organic Cotton from Jaycotts.co.uk could not be more summery. It is cool and fresh and screams out to be made into a cool dress for yourself or a child.

I wanted to pick out one of the colours and add contrast elements and as it happened I had the plain fabric and lining left over from a previous post and they are exactly what wanted.
In this blog post we are going to learn a little bit about pattern matching and I will show you an easy way of sewing a lapped zipper

What usually happens with me is that I choose fabric and pattern carefully but when I see the two together it somehow doesn't thrill me. I actually made two different toile's ( test garments ) before settling on this particular pattern. In addition to the main fabric I had the contrast fabric and white lining left over from a previous project and wanted to use them as they are a perfect match for the lovely beach hut design.
The test garments were finished and are being worn by the way so nothing was lost.
Unfortunately I made this dress using a pattern which is not now available, but there are plenty of similar ones so you are still able to make this pretty dress

These are the links to all the fabrics used ,
By The Coast fabric Beach Huts Organic Cotton
White Lining Fabric Lining
Painters Palette plain Cotton fabric Painters Palette
These three fabrics come in other colourways too so do look at the entire fabric section. There are many fabulous prints at very good prices, I really do like them all. They are of the highest quality and are suitable for quilting, sewing, accessories, bags..........
Pattern
The pattern which I used unfortunately is out of stock as I said , so here are some alternatives which are very similar and which would work just as well.

New New Look 6447

I recommend View D


Have you ever tried pattern matching before? Don't be daunted by it but do select a sewing pattern with minimum seams to make it easier. This is for sewing newbies so if you are an experienced sewist do use your own method.
Pattern matching Starts with cutting out.
Take a good look at your fabric and find the " repeat" . If your pattern pieces are all placed with the hem at the bottom of each repeat your horizontal lines will match. As extra insurance make some "balance marks" on your pattern which indicate where you need the pattern to match. These can then be placed on your fabric with the marks in matching places.
Always match straight edges such as the centre back. As you can see I have made sure that the horizontal lines match but I have not worried too much about the vertical lines. More often than not vertical lines will not match anyway, particularly on side seams and curved edges where pattern matching is impossible. Sewing well comes with practice and experience ,and I feel that new skills should be added only at a pace with which you are comfortable with.
As you gain in experience you will be able to match the pattern on straight seams so that the entire pattern is perfect and it is impossible to see the seam.
A good tip is to use plain fabric between top and bottom to draw the eye away from the patterned fabric.
The Lapped zipper

This is my favourite zip insertion method, it is much loved by tailors and couture sewists and always gives a neat professional look to any garment.
I have an easy way of achieving the perfect result every time.
It all starts with cutting out so do read this first.
You need to increase the seam allowance for the zipper to exactly one inch.
NB It is usual to leave the seam allowance below the zipper at 5/8"
Mark this inch at the top and bottom of the seam and stitch the centre back seam from the hem up to this mark. Press this seam open and neaten the edges.
To insert the zipper,
On the LEFT side fold under and press the full 1" seam.

On the RIGHT side fold under and press 3/4" seam.

With the zipper closed, place it under the underlay on the left, having the fold of the fabric right next to the right side of the zipper teeth as in the photo above.

As pins often move about, I use tape to stick the fabric down onto the zipper . I make sure that the edge of the tape is on the stitching line, which gives a convenient line to sew alongside

Fold the overlap on top of the zipper, this will hide your previous stitching . Tape the overlap down with the right side along the stitching line and sew. When the insertion is complete You will see just one row of stitching.
This sounds confusing but try it! There is a slightly more in depth tutorial on my own blog Lapped zipper Tutorial

Please though, if you are using contrasting fabrics do use the correct coloured thread for each colour. If you don't do this the garment will never look professional and your eye will be instantly drawn to the wrong coloured threads
This simple step will only take a minute longer and is definitely worthwhile, so please don't ignore this step.

How is it that no matter how many buttons you have, there are never the ones you want?
Problem solved with Cover buttons and button maker
self cover buttons are easy to make and very inexpensive. You won't necessarily need them on your garment, they just help to tie my two fabrics together
The button maker is simplicity itself, and it will take just seconds to make perfect buttons

The final task is to give the garment one last press with my Oliso-proplus-smart-iron, do read my review of this super iron on
Oliso-proplus-smart-iron review
It is certainly an asset to your sewing and I love mine

The contract waist and sleeve bands lift the white main fabric.
By the way I lined the skirt with white lining fabric as it is a little bit sheer .This is a topic for a full blog post I feel.
I also made the dress slightly roomier as white fabric can look unattractive if the garment is too tight,

I hope that this blog post has given you a few ideas of your own, sewing printed fabrics is nothing to be afraid of and once attempted you can then move onto checks where horizontal and vertical lines need matching.

To discuss any of the products used in this post please contact Jaycotts directly on 01244 394099
For showroom information and opening hours go to Visit Jaycotts
Thank you for reading this post. Please forward it to a friend and do sign up to Jaycotts.co.uk newsletter
Angela
Sewangelicthreads
.